A Better Best Ampersand

by Andy Appleton

Dan Cederholm's best available ampersand technique is by now prety well known and is in use all over the place -- including in the footer of this very site.

But when I was implementing it, I wanted to make a small change to the font stack. So this:

span.amp {
  font-family:Baskerville,'Goudy Old Style',Palatino,'Book Antiqua',serif;
  font-style:italic;
}

Became this:

span.amp {
  font-family:Baskerville,GoudyBookletter1911,'Goudy Old Style',Palatino,'Book Antiqua',serif;
  font-style:italic;
}

My plan was to include the ampersand from the free font Goudy Bookletter 1911 (by the League of Movable Type) as the first fallback for those without Baskerville installed. This font could be served using the CSS3 @font-face rule to allow pretty much all users to see my second choice ampersand. I also created a custom subset of the font containing just the ampersand, to reduce bandwidth requirements and load time.

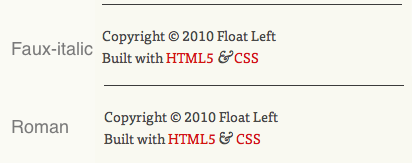
This all worked nicely except for the fact that I was specifying the italic version be used for each, and the Goudy Bookletter 1911 ampersand belongs to the Roman letterset. This forces the browser to render the Roman glyph as an ugly slanted faux-italc.

This may not seem like too much of an issue, but if the whole point of the exercise is to present the very best ampersand available then it kind of defeats the object to serve up a distorted version.

So how can we fix this? There is no way in CSS to specify italics for one font in a font stack and roman for another, so we need something a little bit more clever...

The Solution

My solution to this little puzzler relies on JavaScript, and works like this:

  1. Detect whether the user has Baskerville installed.
  2. Assign a class to the <body> element (either .baskerville or .no-baskerville.
  3. Detect whether the user has a @font-face compatible browser.
  4. Assign a class to the <body> element (either .fontface or .no-fontface.
  5. Define different CSS properties depending on which classes are set on the <body> element.
  6. Implementation

    1. To detect whether Baskerville is installed, I am using a jQuery script from Remy Sharp.

      What makes this important is that: Comic Sans, in all it's glory, is actually unique.

      From there it's a simple case of comparing the font in question against Comic Sans and if they match, it's not installed.

      Implementation is as simple as including Remy's script in the page, and running the following jQuery function:

      $(function() {
        font.setup();
        $('html').addClass(font.isInstalled('Baskerville') ? 'baskerville' : 'no-baskerville');
      });
    2. Now we have a class assigned to the <body> element telling us if we have Baskerville installed, we can move on to @font-face detection.

      For me, this was even easier as I was already using Modernizr to allow HTML5 elements. By including the modernizr.js script on a page, you automatically get a number of classes assigned to the <body> element telling you which CSS3 features are supported by the user's browser -- including .fontface or .no-fontface.

    3. All that remains then is to craft a bit of CSS to properly take advantage of these new classes:

      span.amp { /*To take care of those with JavaScript disabled*/
      	font-family: Baskerville,GoudyBookletter1911Regular,'Goudy Old Style',Palatino,'Book Antiqua',serif;
      	font-style: italic;
      }
      
      .baskerville span.amp { /*For those with Baskerville installed*/
      	font-family: Baskerville;
      	font-style: italic;
      }
      
      .no-baskerville.fontface span.amp { /*For those without Baskerville but with @font-face support*/
      	font-family: GoudyBookletter1911Regular;
      	font-style: normal;
      }
      
      .no-baskerville.no-fontface span.amp { /*For those without Baskeriville or @font-face support*/
      	font-family: 'Goudy Old Style',Palatino,'Book Antiqua',serif;
      	font-style:italic;
      }
    4. Summary

      You may feel that this is all a bit much just to avoid a slopey ampersand, and you might be right. But isn't it the small details which separate good design and great design? I know I love to see sites where the author has clearly sweated every single detail, and I want others to see that in my work too.

Zootool

by Andy Appleton

What a fantastic tool – allows you to collect clippings of images and pages from around the web and save them for inspiration. Check out my zoo.

http://zootool.com/ →

Wordpress Relative Post Time

by Andy Appleton

This is a small function I wrote this morning to generate relative time stamps for Wordpress posts, similar to those used on Twitter. It is pretty simple to implement, and will allow you to display a relative timestamp simply by replacing the <?php post_date(); ?> call with <?php relative_time(); ?> in your theme.

What it does

This function displays one of the following, depending on the time since the post was published:

  • "Less than a minute ago"
  • "About a minute ago"
  • "XX minutes ago"
  • "About an hour ago"
  • "XX hours ago"
  • The date in the format "Day Month Year Time" (12 hour)

Implementation

Simply add the following code to the functions.php file of your theme:

<?php
function relative_time() {
    $post_date = get_the_time('U');
    $delta = time() - $post_date;
    if ( $delta < 60 ) {
        echo 'Less than a minute ago';
    }
    elseif ($delta > 60 && $delta < 120){
        echo 'About a minute ago';
    }
    elseif ($delta > 120 && $delta < (60*60)){
        echo strval(round(($delta/60),0)), ' minutes ago';
    }
    elseif ($delta > (60*60) && $delta < (120*60)){
        echo 'About an hour ago';
    }
    elseif ($delta > (120*60) && $delta < (24*60*60)){
        echo strval(round(($delta/3600),0)), ' hours ago';
    }
    else {
        echo the_time('j\<\s\u\p\>S\<\/\s\u\p\> M y g:i a');
    }
}
?>

You can now display the relative time of a post by adding the following anywhere within the loop:

<?php relative_time(); ?>

That's it really, hopefully it will prove useful to somebody!

IE6 Double Margin: A Simple jQuery Fix

by Andy Appleton

Among the many small irritations we have to contend with when developing a website for IE6 is the so called double margin bug.This bug causes floated elements to render with a double left margin. The bug is described here, and a solution here. Essentially the element must be forced to a state known as "has layout".

The Original Solution

The solution recommended is as follows:

The work around for this bug is preposterously simple, counter-intuitive and utterly in violation of the W3C recommendations—simply change the style of the floated element to "display: inline" and the problem disappears.

So do this--

<div class="box">
   <div class="sidebar" style="display: inline">content
   </div>
   content
</div>

A slightly cleaner way to achieve this is to create a separate ie.css stylesheet, and add a declaration looking something like this:

.myclass1, .myclass2 {display:inline;}

Cleaner still would be to enclose this ie.css stylesheet in a conditional comment so that it is only served to IE6:

<!--[if lte IE 7]>
<link rel="stylesheet" href="ie.css" type="text/css" media="screen" />
<![endif]-->

We can now add all of the elements which exhibit this behaviour to the CSS declaration, safe in the knowledge that it will only be seen by IE versions 6 and below.

A Simpler Way

This solution is good, but it does leave us with the problem of having to maintain a long list of id and class names in the ie.css file. A more straightforward way to deal with the issue would be to write a rule stating that all floated elements should also have display:inline; applied. Unfortunately this is not possible in CSS, but we can use a little JavaScript and RegEx trickery to achieve the same thing.

  1. This example uses the excellent and extremely easy to use jQuery JavaScript library, so the first step is to link to it in your page's <head> element:

    <script type="text/javascript" src="http://ajax.googleapis.com/ajax/libs/jquery/1.3.2/jquery.min.js"></script>

    Note: I am linking to the Google hosted version of the library, you may prefer to host your own copy and link to that.

  2. Next we will create a separate ie.js file, and link to that in the <head> section of the page:

    <!--[if lte IE 7]>
    <script src="ie.js" type="text/javascript"></script>
    <![endif]-->

    Be sure to place this after the link to the core jQuery library.

  3. Into the ie.js file, we will add the following:

    // Initialise jQuery Regex...
    jQuery.expr[':'].regex = function(elem, index, match) {
        var matchParams = match[3].split(','),
            validLabels = /^(data|css):/,
            attr = {
                method: matchParams[0].match(validLabels) ?
                            matchParams[0].split(':')[0] : 'attr',
                property: matchParams.shift().replace(validLabels,'')
            },
            regexFlags = 'ig',
            regex = new RegExp(matchParams.join('').replace(/^\s+|\s+$/g,''), regexFlags);
        return regex.test(jQuery(elem)[attr.method](attr.property));
    }
    
    // ...and use it to overcome the 'double margin' bug. Add display:inline to all floated elements
    function double_margin() {
    	$(':regex(css:float, left|right)').css('display', 'inline');
    }
    
    // Let's go!
    $(document).ready(function() {
    	double_margin();
    });

    What we are doing here is:

    1. Telling jQuery that we plan to use regular expressions.
    2. Defining a jQuery function (double_margin()) which will search for every element which has float:left; or float:right; applied, and add an inline style of display:inline; to each
    3. Telling this function to fire when the document loads.

There we have it. A simple way to overcome the double margin bug by assigning display:inline; to all floated elements. It should be noted that this method will only work for users who have JavaScript turned on. For this reason it is probably wise to check your web stats before implementing this on a site.

An Introduction

by Andy Appleton

My name is Andrew Appleton and I spend my days working as a Mechanical Engineer. I have started this site because I am passionate about web design and want to be able to work on small scale client projects during the weekend and evenings.

I suppose you could call this a side project for me – something I am doing for the love of it rather than being driven by any sort of financial need. I hope to be able to bring that love to my designs and to produce carefully crafted work which people will be proud of.

This little project has been in the works since last August. I have been working on it when I can, and it has been through five full redesigns before it was even launched. I hope the design of this site reflects my preference for a well structured layout which relies on strong typography and information hierachy rather than loud imagery or flashy gimmicks.

I plan to update the notebook section exactly as often as I feel I need to – it will serve as an outlet for my thoughts on web design and as a record of the small tips, tricks and hints which I may pick up along the way. This is as much for my own benefit as for that of anyone reading, but obviously if anyone finds it interesting I would be delighted!

I had been running a little blog – http://appleton.me/ and I have imported a few posts from there to get the ball rolling.

I will also post links which I find useful, interesting or amusing – again this is as much as a personal record as it is for anyone to follow, but feel free to subscribe and keep up with what I’m looking at!

If all of this paints me as the kind of chap you would like to work with then please drop me a line. I am currently accepting new work and would love to help you build something wonderful!