Learning to type like a grown up

by Andy Appleton

Over the last year I’ve slowly developed hand and wrist pain from long stints at the keyboard. I recently decided that enough is enough and I need to take it seriously if I want to be able to do the job I love for the rest of my career. My first naive attempt at a fix was to purchase an ergonomic split keyboard. I went for the Microsoft Sculpt ergonomic after reading some good reviews, particularly Marco Arment’s.

This actually made things worse and it didn’t take me long to figure out that the problem was my typing technique. Like many people of my generation I was not taught touch typing and have never felt the motivation to learn independently. I was using two fingers per hand and making some weird shapes as I reached for different key combos. The rotated hand position on the split keyboard accentuated these movements which led to more pain. On top of that I realised that I needed to look at the keyboard out of the bottom of my eyes as I typed – the split layout hid the keys from view which led to a lot of missed keys.

Doing it properly

It was Christmas and I had a few days off work so I decided to stop making excuses and learn to touch type. I went cold turkey on my old technique and started following the course on typingclub.com. It was hugely frustrating for about two days until I had worked through the lessons for all of the main characters but I was able to become reasonably productive within half a week, albeit at a glacial 20 words per minute.

I’m now a month in and am able to type fluently without looking the keyboard and often without consciously thinking about the location of individual keys. My speed is up in the 35-40 WPM range and I’m more accurate too. I’ve pretty much completed the typing club course but I keep revisiting the speed test lessons to try and edge up my speed and accuracy. I now absolutely love my ergonomic keyboard – it keeps my wrists at a neutral angle and is really comfortable. If you secretly know that your typing technique sucks you owe it to yourself to learn touch typing. You will be frustrated for a few days at worst and will be faster and more comfortable within a month.

What about the wrist pain?

Touch typing is just one helpful factor in trying to eliminate the pain I’ve been experiencing this last month I’ve also done a lot of reading and have visited a doctor. A big change is that I’ve started using BreakTime app to force me to take a 2 minute break every 20 minutes [1]. This lets me stretch out my hands regularly to make sure they’re not cramped in the same position for long periods. I’ve also made a conscious effort to not use a keyboard unless it’s really necessary, I’m trying to keep away from the computer at the weekend and in the evening to give my hands time to rest and recover.

The doctor tells me that I can expect it to take 6-8 months to fully recover but I’m starting to feel a bit better already. If you’re dealing with hand or wrist pain I would strongly recommend doing some reading (this page from Clay Scott is very thorough) and making some changes to your work setup. Mine is not too bad and hopefully I’ve made good changes early enough that it won’t become a longterm problem, I strongly encourage you to do the same.

  1. I was expecting this to kill productivity but as a programmer I actually find it a good opportunity to think about whether what I'm doing is really correct. It's easy to blindly dive down the rabbit hole of a suboptimal solution and the breaks are a great way to counter that.

Taking Ember for a spin

by Andy Appleton

After Ember.js hit 1.0 recently I decided to give it a fair shot and try it out for a week in the context of an app I’m working on. The app actually uses Angular, which I’m very comfortable with but it’s always good to evaluate alternatives and be able to pick a tool based on experience.

I’m building a little recipe/shopping list app. The idea is that you can generate a shopping list by selecting recipes you’d like to cook and how many people it should serve. The ingredients are summed up to create a list which you can take to the shops.

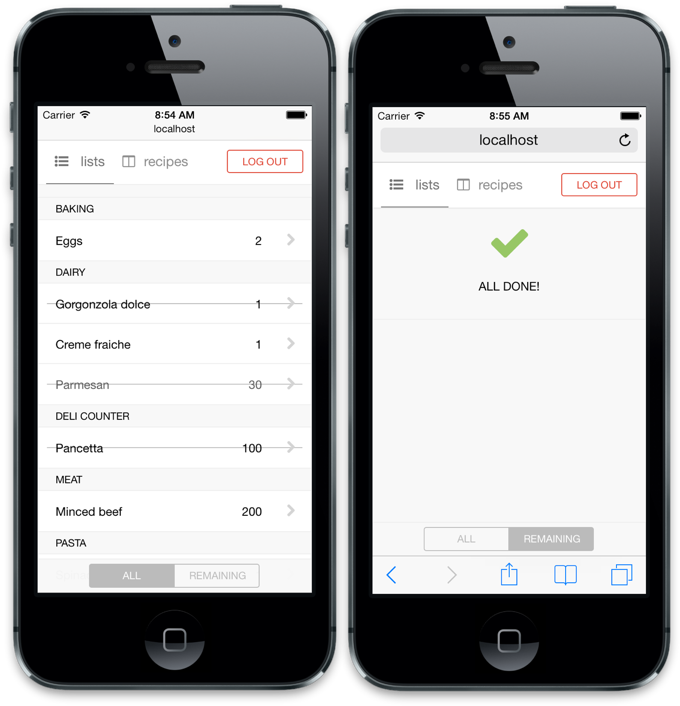
List page with crossed items and with completed screen

This list page has a few interesting features:

  • Tapping/clicking a single item will strike a line through it. The state of checked and unchecked items is persisted in localStorage only.
  • There is a toggle to show and hide already checked items.
  • When all items are checked and the toggle is set to hide checked items, a complete screen shows.

I already had this page implemented in Angular so I knew how it should work and I figured it would be a good comparison. I created a new git branch, deleted all of the Angular code and jumped into reimplementing it with Ember. Here’s a loose collection of my conclusions.

ember-data

I found a lot to like about Ember. In Ember data it has a very solid model and persistence abstraction which I really appreciated coming from Angular which has next to nothing.

It provides a store object in the browser which you make queries against. Either it already contains the data you requested or it makes a round trip to the server to retrieve it, caching for next time. Either way it returns a promise so the interface is consistent. Over the life of a long running single page app I can see this saving a lot of needless requests.

Models declare associations to other models and attribute types are declared upfront. I much prefer this to the Angular way of just parsing server JSON into a plain JavaScript object regardless of content. In the past I’ve encountered bugs where server JSON changed subtly and broke some front end functionality in a way I didn’t spot until it was too late. Ember expects attributes to be present and of the correct type and throws helpful errors when they’re not.

Ember.Component

Ember’s answer to Angular directives and an attempt to forward patch web component support. Ember.Component does a lot less than Angular’s directive, but I think it is a great example of providing 80% of the power with much less learning overhead.

All Ember components get a new controller and there is only one way of scoping the controller. Contrast with Angular where you must learn about isolate and inherit scopes, transclusion and linking/compile functions before you can be productive — directives are seen as an advanced topic in Angular, components are not in Ember and I think that is to its immense credit.

I implemented each list item as component and handled the localStorage persistence inside the individual controllers — it was easy to get started with, especially having some prior knowledge of web components and Angular directives.

Naming Conventions

Ember relies heavily on naming conventions. Your controllers and templates must be named just so to be constructed and rendered correctly and all objects must be placed into a single app namespace object.

I prefer the flexibility of a module system for declaring dependencies and would prefer not to rely on naming conventions, which can be easily typoed. The flip side is that module systems (particularly Angular’s) add a lot of boilerplate code to a file which Ember just doesn’t need.

Testing

The Ember docs are excellent in almost all ways, but there is no information about testing which I found quite disappointing. The information I was able to find seemed more focused on integration level tests so I’d love to see a post or some docs on unit test best practices. This is one area where Angular really shines and it gives a lot of confidence putting an app into production knowing that it it well tested.

Summary

Overall I’ve really enjoyed working with Ember. I’m far more productive with Angular, but then I’m also far more experienced. I’m going to finish building my shopping list app with Angular but for my next project I’ll seriously consider Ember as an alternative. I think Ember will really shine with a more data-rich application and I’m looking forward to what they can do with server side pre-rendering.

If you’re looking to get started with Ember, here’s some resources which helped me out:

Diving into AngularJS

by Andy Appleton

This weekend I’ve had some spare time and I’ve used it to take a proper look at AngularJS. I’ve used Backbone a lot and find myself defaulting to it as soon as a JavaScript application gets complicated. I realised that I was ignoring everything else because I already know Backbone and that’s not a good place to be. Time to jump into something new.

When all you have is a hammer…

Initially I downloaded the Angular source and launched into trying to build something simple with it but I found this a really frustrating experience. I consider myself a pretty competent JS developer but nothing really worked and the concepts didn’t click. Making me feel stupid is a quick way to turn me off of something.

I took a step back and realised that I was trying so hard to shoehorn what I knew about MVC from Rails and Backbone into the app that I wasn’t letting myself see the bigger picture. I spent an hour watching and coding along with a tutorial video and by the end felt I really understood the basics. Just by investing a small amount of time into learning the fundamentals I’m now really productive with Angular. Making me feel smart is a great way to keep me interested in something!

In less than a day I’ve come to love the declarative nature of the code I’m writing. Everything is so terse and I’m spending zero time writing what I would now consider boilerplate DOM manipulation or event binding code. This is really exciting coming from a world of manual template rendering and zombie events and I love not having to think about that stuff.

Conventions

I listened to an interview with Chad Fowler this week. He spoke about how Rails is not necessarily the best web framework but it offers such a strong set of conventions and has such a strong community that it really allows you to forget about hooking an app together and just focus on the product you’re trying to build.

I feel like Angular offers the same level of convention and I’m really looking forward to getting stuck into a bigger project with it. I don’t want to spend my time writing glue code, clearing up old views, manually re-rendering templates on data change or writing form input handlers. I know there are libraries to handle these things in Backbone, but I also don’t want to be depending on 20 plugins just to get a functioning app.

Step back

These are just my initial thoughts after playing with the framework for a day and maybe I’ll change my mind after I’ve used it more extensively but right now I’m loving Angular and can’t see myself choosing Backbone the next time I start a big front end JS project.

If you’re looking to get started with Angular I’d recommend you check out the following resources:

  • Dan Whalin’s video tutorial really helped me to get the fundamentals of Angular.
  • egghead.io is a great collection of screencasts covering some more specific cases.
  • The AngularJS project homepage (although the docs are not that beginner friendly).

Responsive Web Design is not a war

by Andy Appleton

Recently there’s been a bit of a furore around a post written after we at GoCardless launched our redesigned homepages. I wanted to make a few points – to be clear these are my thoughts, and they’re not necessarily shared by my colleagues.

Responsive Web Design is not always appropriate

Elliot Jay Stocks says “the war has not yet been won”. I think that’s a rather black and white way to look at a much more nuanced issue and that painting it as a war is not especially helpful. As with everything on the web there’s degrees of appropriateness.

In a lot of cases, a well thought out responsive site is awesome. A great example would be a blog (go on, resize the window on this page). In other cases though it’s totally ill-suited.

Take the example of the GoCardless homepage. There’s a fair amount of information here and not everyone wants to see all of it. By setting a small screen’s zoom level to 100% and inlining all of the content we’re forcing the user to scroll (and scroll and scroll) through potentially useless information. In my opinion it’s much better to provide a high level overview and let the user zoom into the interesting sections.

I appreciate that Elliot is arguing that it’s not all about mobile but honestly which device are you using that has a very narrow screen but can’t zoom and pan?

Let’s look at GoCardless on an iPhone as an example:

RWD comparison

Which is a better experience? Which gives the user a quicker understanding of what’s happening?

I think online maps are a good analogy. You wouldn’t open Google Maps, zoom in as far as possible and then start panning around to find the area you want to look at. Instead you look at the overview, pan around until you’re in broadly the right place and then start to focus in.

In many cases, especially marketing and homepages, this is how I would like to use websites on a mobile device and I bet I’m not alone.

Obviously it’s not all bad

That said, there’s clearly a place for responsive design. I’m not saying that it’s a fad and should be ignored. Blogs look great as a phone-width column of text, I wouldn’t want to be zooming and panning around GMail on my phone and that’s just two examples off the top of my head.

All I’m saying is that as with everything there’s a time and a place and that I often find myself wishing I could see the full site rather than the scaled down responsive version I’m presented with. Let’s not go off the deep end with talk of wars and treat this as the nuanced issue that it is.

Prefilling Backbone model data

by Andy Appleton

The Backbone docs suggest that you should bootstrap data into your page on load. This allows the application to be responsive and ready to use as soon as the JavaScript is loaded. This is not always possible though – for example if the app does not have any kind of server side templating or if it interacts with an external API. (DailyJS has a good example of this kind of application).

In this case the application can seem slow to start as it first loads the JavaScript and then makes one or many API calls to populate the interface with data. Caching can help to a degree but this does not allow for new data to be fetched.

Cache Prefilling

I have a plugin called Backbone fetch cache which provides an in-memory and localStorage cache for Backbone’s fetch method. I’ve recently added a prefill option which will return cached data immediately (where available) but still make the background API request.

This is really nice because it allows us to present the user with a working interface immediately and then update the data in place as the AJAX requests complete. If you’ve ever used the Instagram iPhone app you might notice that it does something similar, presenting an interface with the last available data whilst it makes background API calls to get the latest.

Use

The initial cache hit triggers all of the same events (add, reset, change etc) as an actual call to fetch, but the success callback is not fired until the AJAX call completes. Instead a new callback is available, prefillSuccess:

myModel.fetch({
  prefill: true,
  prefillSuccess: someCallback, // Fires when the cache hit happens
  success: anotherCallback // Fires after the AJAX call
});

If you prefer working with promises, the call to fetch also returns an instance of jQuery’s $.Deferred. A progress event is triggered when the cache hit occurs and the promise is resolved when the AJAX call completes:

var modelPromise = myModel.fetch({ prefill: true });
modelPromise.progress(someCallback); // Fires when the cache hit happens
modelPromise.done(anotherCallback); // Fires after the AJAX call

All in all I think this is a pretty nice solution to the problem of a slow initial page load for a single page JS application. As always the code and tests are available on GitHub.

Backbone fetch cache

by Andy Appleton

Building a Backbone application which interacts with an external API means a lot of calls to model.fetch() and collection.fetch(). This can be pretty inefficient especially if the API does not set cache headers on responses.

Backbone fetch cache is a Backbone plugin which overrides the fetch method on Backbone models and collections to implement caching. Just include the script on your page and start calling fetch with cache: true in the options:

// Return cached data if available, otherwise make an AJAX request
myModel.fetch({ cache: true });

By default responses are cached in memory under Backbone.fetchCache._cache and also persisted to localStorage if available. This can be disabled by setting:

// Cache in memory but not localStorage
Backbone.fetchCache.localStorage = false;

Cached items are saved for 5 minutes by default, but this is also configurable by passing an expires option with a value in seconds to the fetch call:

// Expire this value in 1 minute
myModel.fetch({ cache: true, expires: 60 })

All options are passed through to the actual fetch call so you can still register success and error callbacks for actual AJAX requests. A promise is returned from the fake fetch method so the method signature should be identical whether the data comes from a cache hit or miss.

The code is all available on GitHub along with a full set of tests.

Moving on

by Andy Appleton

A quick personal announcement. I’m leaving my job at Mint Digital on the 19th December and starting as a developer at GoCardless on the 7th January.

I’ve had a blast working with the talented folks at Mint and I’ll be extremely sad to leave but I’m also really excited about the challenge at GoCardless and can’t wait to get started.

CoffeeScript is just JavaScript

by Andy Appleton

Most of the JavaScript I have written over the last year has actually been CoffeeScript. It occurred to me the other day that I’m in the same mental mode whether I’m writing JS or CS and I think that is because at it’s heart CoffeeScript is just a more succinct way to write the same language.

There is very little extra functionality that you get with CoffeeScript that you couldn’t do with plain JS, it’s just nicer to write. A good example is the class keyword, all it does is produce a constructor function with methods on the prototype object – easy enough with JavaScript but more expressive and succinct with CoffeeScript.

class Bacon
  eat: -> 'nom'

Compiles to

function Bacon() {}

Bacon.prototype.eat = function() {
  return 'nom';
};

If I were douchey enough I’d say it was like poetry. Actually I am and it is.

I think the reason for this is that CoffeeScript doesn’t change any of the fundamental rules of the language. this still behaves the same way and you can still use call and apply to invoke functions however you like regardless of where they originate.

There was a brief period where loops would fake a new scope with an inner function but happily that’s gone. In fact the only fundamental change I can think of is that variables are local to the current scope by default and I think most people would agree that loosing var is an improvement.

For me this is why compile to JS languages like Dart and TypeScript are completely uninteresting. I don’t want another language, just a way to write the words function and prototype a little less often and with fewer curly braces and semicolons.

Grunt Coffee Server

by Andy Appleton

TL;DR I wrote a Grunt task to live compile CoffeeScript for local development.

Full story

Somewhat inspired by my colleague Phil’s tweet, I’ve written a Grunt plugin to make it easy to start writing any JavaScript project in CoffeeScript.

It’s a simple static web server with a twist – request a .js file and it will be returned if it exists. If it doesn’t exist then the server will try and find a .coffee version of the file and return the compiled output if it can.

N.B. It does not deal with compilation for deployment, there’s already a plugin for that.

Usage

This is packaged up as a Grunt task so you’ll need to install Grunt from NPM first (might as well do that globally):

npm install -g grunt

Then install the task:

npm install grunt-coffee-server

Next you’ll need a gruntfile:

grunt init:gruntfile

Follow the instructions and take a look in your new grunt.js file. We need to register the new task by adding the following line:

grunt.loadNpmTasks('grunt-coffee-server');

There are also a couple of configuration options available which are read from the server config key:

grunt.initConfig({
  server: {
    port: 1337 // defaults to 3000 if not set
    base: './public' // defaults to ./ if not set
  }
});

Finally run the server:

grunt coffee-server

I’ve written this kind of server manually a few times now for local development so I know it’ll be handy for me – hopefully it’ll be useful for you too.

It’s on GitHub so feel free to fork, pull request etc!

Using Grunt and Jasmine with AMD

by Andy Appleton

Since yesterday’s post on running Jasmine specs with Grunt I have been working to integrate with a project which uses RequireJS. The Grunt Jasmine runner task I am using does not support AMD specs so I have created a fork which is available on GitHub.

To use it you will need to specify the repo URL in your package.json file…

"dependencies": {
  "grunt-jasmine-runner": "git://github.com/mrappleton/grunt-jasmine-runner.git"
}

If the amd flag is set in the grunt.js config file specs will be loaded via an AMD require call. This does not make an assumption about the AMD library being used, you must specify the path to that in the helpers option. Here’s a full example gruntfile:

module.exports = function(grunt) {
  grunt.initConfig({
    jasmine : {
      amd: true,
      // Your Jasmine spec files
      specs : 'specs/**/*spec.js',
      // Your spec helper files
      helpers: [
        '/path/to/require.js',
        '/path/to/requireConfig.js'
      ],
    }
  });

  // Register tasks.
  grunt.loadNpmTasks('grunt-jasmine-runner');

  // Default task.
  grunt.registerTask('default', 'jasmine');
};

This assumes that your spec files are AMD modules which require the source files as necessary, e.g.

define(['/src/myModule.js'], function(MyModule){
  describe('MyModule', function(){
    // etc...
  });
});

The spec runner HTML file will then require each spec file in turn and execute the contents.

Summary

This is not the most flexible implementation, but it works for my use case and I think is worth releasing. I opened a pull request on the main repo which was (quite reasonably) declined as they are apparently already working on AMD support.

I’ll most probably switch back to the original version once AMD support arrives but for now this fork will do nicely for me and I hope it can be useful to others.