Bootstrap

by Andy Appleton

Starting a website from scratch can involve a lot of repetitive setup each time and most developers tend to keep a barebones folder to be used as a start point.

I decided to clean mine up and make it available on Github in two flavours. First, there’s website bootstrap, containing the files and folders I tend to use for every project. This is just flat HTML, CSS and JavaScript.

Second there’s Perch bootstrap which is similar except that it is designed to be used in a PHP environment and is what I use when I’m building a site with Perch.

It’s called Perch bootstrap because that’s what I use it for, but there’s no reason it couldn’t be adapted for use with any PHP application.

There’s no kind of license on either so feel free to download, fork, redistribute or do whatever else makes you happy!

Archiving an Old WordPress Site

by Andy Appleton

I recently retired the crappy old neglected blog which had been festering on my personal domain, appleton.me and replaced it with a shiny new one page site. Whilst I don’t think many people will miss the old content, I was keen not to just let it disappear (what would Jeremy Keith say…).

The proper thing to do would be to move the old site to a subdomain and set up 301 redirects. This would mean that the (few) links to the old site would not die and the three people who ever cared would still be able to get to the content.

Static Content

The old site ran on WordPress, but there is really no need for a CMS when the site is never going to be updated again. It is also a good idea to archive information in the simplest file format available – who knows if PHP & MySQL will be available in 50 years and if they will be able to run a 50 year old weblog? The simplest format here would be plain HTML and CSS files. This also offers the benefit of reduced server load and improved page load times because we aren’t waiting for PHP and SQL queries to execute.

A Plan

So the idea seems simple:

  1. Create a static HTML & CSS version of the old site.
  2. Set it up on a subdomain
  3. Configure 301 redirects to all of the old content

And it turns out is was simple. Here’s how:

Staticification

I played around with wget for a while and learned that I am not really suited to command line tools. Then I found the Really Static plugin for WordPress which will scrape the entire site and produce a static version all nicely arranged into files and folders. This static version will directly mimic the URL structure of the dynamic site and is exactly what I was after.

I added a big old red banner to the top of the dynamic site (to let people know they’re looking at out of date content) and then set the plugin scraping. One thing to remember here is that all links will now be hard coded into the site – that means that you need to tell Really Static what subdomain you will be using (in my case old.appleton.me) before you start the process.

Now I have a plain HTML version of the site which I can configure on a subdomain. The second step is to redirect incoming links to the new (old) subdomain.

.htaccess and 301 redirects

I’m on an Apache web server so I need to configure a set of rewrite rules for all the old pages. Since the new site is only one page I can create a rule which says “Redirect everything at http://appleton.me/* to http://old.appleton.me/* except for the site root”.

If only .htaccess files we as easy as that. I needed a bit of help with this part, but fortunately Stack Overflow is awesome.

Here is the rewrite rule which got the job done:

<IfModule mod_rewrite.c>
  RewriteEngine On
</IfModule>

RewriteCond %{HTTP_HOST} ^appleton[.]me$ [NC]
RewriteCond %{REQUEST_URI} !^(/(index[.](html|php))?)?$
RewriteCond %{REQUEST_FILENAME} !-f
RewriteCond %{REQUEST_FILENAME} !-d
RewriteRule ^(.*)$ http://old.appleton.me/%1$1 [R=301,QSA,L]

Let’s step through it.

The first block tells Apache to enable URL rewriting:

<IfModule mod_rewrite.c>
  RewriteEngine On
</IfModule>

Next we tell it to rewrite all URLs unless they are the site root (or /index.html or /index.php):

RewriteCond %{HTTP_HOST} ^appleton[.]me$ [NC]
RewriteCond %{REQUEST_URI} !^(/(index[.](html|php))?)?$

Tell it to also ignore direct requests for files (so that the CSS and JavaScript requests for the new index.html don’t get rewritten):

RewriteCond %{REQUEST_FILENAME} !-f
RewriteCond %{REQUEST_FILENAME} !-d

And finally tell it to return a 301 header and redirect to http://old.appleton.me/

RewriteRule ^(.*)$ http://old.appleton.me/%1$1 [R=301,QSA,L]

That just about covers it. I now have a new single page on appleton.me and the old site archived at old.appleton.me. There’s one last thing to consider though…

404 Errors

It is good practice to serve a 404 page when someone requests a page which doesn’t exist. The redirect rules we have set up will send any URL (real or non-existent) to the old.appleton.me subdomain. What I really want is for these 404 errors to be sent to my nice custom 404 page at appleton.me/404.html.

To do this I set up another redirect, this time in the old.appleton.me domain root:

<IfModule mod_rewrite.c>
  RewriteEngine On
</IfModule>

ErrorDocument 404 http://appleton.me/404.html

This little rule just tells Apache to enable the rewrite engine and send all 404 errors to appleton.me/404.html.

So there it is, a fully static archive of my old WordPress site complete with 301 redirects to all old content – no link rot and no reliance on databases and PHP.
Minted

by Andy Appleton

Today, I left my job as a Mechanical Engineer with Laing O’Rourke. Tomorrow and Friday, I will stock up on plaid shirts and ironic t-shirts (which are, I understand, compulsory attire). On the 28th March I will start my new job as a front end developer at Mint Digital.

To say I am excited would be an understatement. I am delighted that I will be making a living from something which I really love doing and am looking forward to learning a million new things.

I will still be available for some freelance work, but will need to reduce my workload and be careful not to conflict with anything I’m doing at Mint.

I’m excited for this new adventure in my life and can’t wait to get started!

Up On My Perch

by Andy Appleton

This is a post about a content management system, but first…

A Story

Last year we moved house and for the first time had fireplace. I brought logs and kindling and I tried to light a fire. It didn’t go too well because the logs were too big. They needed to be chopped and I didn’t have an axe so I used a saw. It went badly and I cut a large chunk out of my thumb.

I thought this was about a CMS?

I’m getting to that. The story has a moral. Ready?

Something, something, right tool for the job.

Deep.

I have tended to use Wordpress to build client sites and if I am honest it is because it is the tool I know best. But it is just a tool and just because it will do the job does not necessarily mean it is appropriate.

I have just launched a small site for Daniel Stock, a freelance translator (check him out, he’s good). The requirements were simple - he needed a site where he could show his skills and qualifications and keep a testimonial section up to date.

I could have built this in good ol’ Wordpress — pages for pages (well duh) and custom post type or two for repeating information, in this case a history timeline and testimonials. This approach would have worked just fine, but it would also have ignored a lot of unneeded Wordpress functionality. What would happen when the client tried to add a blog post or a link or a comment from the CMS? None of these would be used, but they would all accept content on the back end.

Get to the Point

Oh, right. So I looked around and found Perch. Perch is a tiny CMS which is designed for small sites. It does not try to be everything to everyone and that’s perfect. It lets you define editable regions within a page and then update them from the admin interface. That’s all.

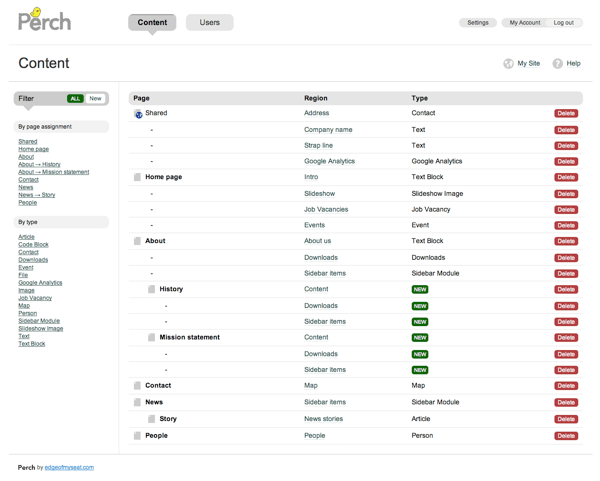
Perch Admin Interface

Well it’s not quite all — in fact you can get pretty advanced if you want to, but the point is that you don’t have to. The admin interface shows a list of pages, and nested beneath each page are lists of the editable regions on those pages. This is great because whilst we designers and developers might think of a site as repeating sets of data, the person updating the site likely thinks in terms of pages. After all that’s how the information is presented on a website.

What is even better is that I did not need to tell Daniel anything more than the admin interface URL, his username and his password. He was able to log in and enter all of the content with literally no instruction — that’s absolutely priceless.

Well, not quite priceless

Perch costs £35 for a license. That is £35 more than Wordpress and £35 more than Drupal. If that bothers you then consider these two points:

  1. You will probably spend more than £35 worth of your time training your client on another CMS
  2. Perch is clearly the product of an enormous amount of time and effort. You get paid for your work right? Well so do other people. Just add £35 to your estimates and forget about it.

But what about building the site?

The admin interface is dead simple and so is developing a site. Build a static site as you usually would and then replace areas which you need to be editable with a simple tag:

<?php perch_content('Tag Name Here'); ?>

Refresh the page and then hit the admin section. Pick the content type (text, text block, image etc) and you’re away. You can build your own content templates if the included set does not meet your needs.

This workflow highlights another nice thing about Perch. It does not seek to control every aspect of the site. It lives in its folder and outputs chunks of HTML into your pages whenever you ask it to. It doesn’t add anything unwanted to the markup and it is super easy to retrofit to a static site.

In Summary…

I hope this has encouraged you to give Perch a try. It is not right for every project, but it is appropriate for a lot of the simple functionality required by small sites. It has excellent documentation and is maintained and developed by super smart people who update it regularly.

It has a plugin architecture which allows for extended functionality (think blogs, events and pages) and costs very little compared to some CMSs. More than anything though it is often exactly the right tool for the job. I won’t be using it for every site I build, but I will be using it whenever it is appropriate to do so.

(Did I mention that I designed and built the site you see when you sign up for a demo? No? Well I did.)